Blog

What Do All The Buttons on My DSLR Camera DO? Aperture (contd)

I previously discussed the effects the Aperture has on an image.  Last time we looked at how the aperture , also called the f-stop or f-number, controls how much light enters the camera and affects the exposure.  Today, we will see how the f-stop affects the Depth of Field.

A lot of people starting off with digital photography have a hard time with depth of field, or as I like to call it ‘how much of the photo in in focus and how much is blurred’.   The amount of bluriness is also often called the bokeh.  

There are a couple of factors that affect the amount of blurriness but it is mainly controlled by your aperture setting/f-stop.  At this point, it is so easy to start writing a scientific paper into apertures, focal lengths, subject to sensor distance etc.

As previously explained, the aperture is the size of the hole that allows light into the camera.  The number is actually fraction, so a f stop of 2.8 is actually 1/2.8 and an f stop of 11 is 1/11.  An aperture of 1 is 1/1 and the entire aperture is open.  This is why a lower number means more of the aperture is open, ½ being larger than 1/8.

What we need to understand is that the lower the number, the shallower the depth of field.  Imagine you have a 100m track and you are standing at the start line with your camera focussed at the runner who is standing 10m away.  The higher your aperture number, the more of the subject and area in front and behind them will be in focus.  If you are at f11, a large chunk of the 100m track will be in focus.  The lower the number, the less is in focus.  If you are at 2.8, you’ll probably have the subject and maybe another few metres behind him in focus.

Here are a set of photos shot in my back garden.  I am focussed on the chair in front, which is about 2m away.  You can see that at f1.4, the depth of field is very shallow and only the chair is in focus.  As the aperture increases, the depth of field also increases and more of the image is in focus.


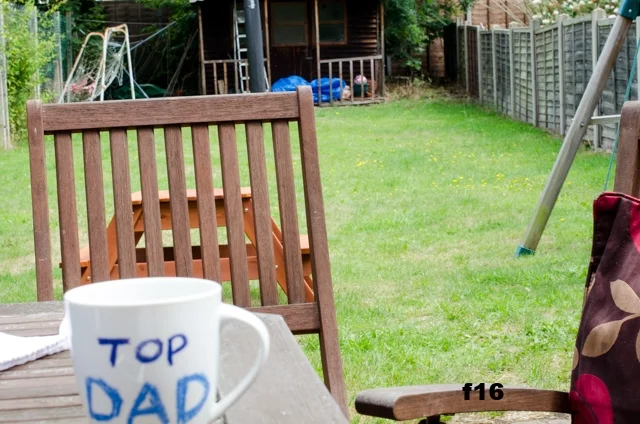
So far so good but there is another factor which affects the depth of field and that is the camera-to-subject distance.  The closer you are to the subject, the narrower the depth of field for the same aperture.  In the photo below, I am focussed on my Top Dad mug, which is about 1m in front of me.  Look at the photo at f2.8 and notice how much of the shed is in focus. 

Below is the first photo when I was focussed on the chair at f2.8.  Both photos were shot at 50mm from the same location and at the same aperture.  But the depth of field is different and the shed in the photo above is much blurrier/has more bokeh.  The closer you are to the subject, the less the depth of field.

Portrait photographers regularly use this fact to make the subject stand out more by blurring out the background. 

This was taken at f1.4 from about 2m away.  The subject is sharp but the background is way out of focus.  This draws the viewers attention to the subject.

This was taken at f1.4 from about 2m away.  The subject is sharp but the background is way out of focus.  This draws the viewers attention to the subject.

What do you need to do now??  Grab you camera, take a seat, set it to aperture priority mode and shoot a series like I did and see how the f-stop affects the depth of field.  Then focus on something else and compare.  My personal belief is that when you start off, you do not need to know all the technical theory behind why things happen.  Just practice and see what happens.  The beauty of digital is that it’s free to shoot! 


A Week-ish in Photography

Some photography related stories from around the globe that caught my eye:

Vincent LaForet's Air

Vincent LaForet is a Pulitzer winning photography and has influenced the lives of many photographers around the world.  His latest project is called Air; he gets into a helicopter at dusk, goes up, keeps going up and comes back with some amazing images!

He has recently shot London and created some jaw-dropping images.  Belowis a video from the London shoot.  The full photographs can be seen in this post..... If you have a super-large monitor, then you are in for a real treat!

Our flight over London, May 2015 took in some of the most iconic sites of the city. We were lucky to have great weather and visibility from 6000ft on this 2 hour flight over the city.

Lily Camera

Most people will be aware of the drone cameras, like the DJI Phantom.  Well, there's a new drone on the market and it is called Lily.  What makes this drone different is that you do not need to need a radio controller for Lily.  You simply wear a GPS tracker and the drone will follow you.  There are different settings you can choose, like have the drone follow you around, do a loop, hover and follow, take slow-mo video, etc.  These can be controlled from the tracker.  Check out the amazing video and wait to see what happens when the guy throws Lily into a river!

Lily is the world's first throw-and-shoot camera. It lets anyone create cinematic footage previously reserved for professional filmmakers. Lily is waterproof, ultra-portable, and shoots stunning HD pictures and videos. Pre-order now at https://www.lily.camera/

It does not ship until next February but if you order now, then it could be yours for around £325 (half of what the price will be at launch), which in drone prices, is a steal!  Check out more features on the Lily Website.

Douglass Sonders

Douglass Sonders is an american commercial photographer.  He recently wrote a post on Fstoppers about a campaign he shot for owners of Jaguar and Land Rover (Tata Motors).  On the webpage there's a lovely animation of the retouching that they did.  I guarantee you will watch it many times looking for changes they made!

'I've lost all the photos on my mobile!!!'

'I've lost all the photos on my mobile!!!'

I have heard this from friends and family a few times now.  What do you do when you pick up your mobile and the screen just refuses to turn on?  Or your mobile is lost or stolen?   You've lost your photos, your videos, your memories.  However, there ways to save you from this heartache.  You can make your mobile phone automatically back up all your photos and continue to back them up as you shoot away.

In the past decade, mobile phones have become such a huge part of our lives.  Most of my time using my phone isn't to actually about making calls. It's for emails, texts, browsing and most of all..... taking photos.  We take hundreds, if not thousands of photos using our mobiles.  It is the one camera that is always with us.  We have hundreds of impromptu photos stored on our mobiles; our children playing, the school Christmas panto, sports day, birthdays, family and friend gatherings, after work drinks etc etc.

We take 1000s of photos to preserve the memories but never really think about what will happen to the photos if we lose our mobile.  Well, there are a few things that we can do that can save us from losing our photos and videos; our child's first steps, the win in the 3-legged race, the night out with the mates and of course that best selfie ever!

Here are a couple of apps and strategies we can all employ. NB I have an iPhone and my experience is limited to that but all these methods will work on other smartphones.


Google Photos app:  Most people use Gmail or have a Google account and with this comes Google Photos.  Sign up for a Google account and download the Google Photos app onto your mobile.  Google Photos now offers unlimited storage of your photographs and uploads your camera roll from your mobile automatically.  There are then options to back up full size images or low res one etc.  The first time you install the app, make sure to hit the 'Back up all photos and videos' button and it will back up everything already on you mobile.  You can also access and share your photos from your PC as well by logging into your Google account.

Flickr app:  Flickr is undergoing a renaissance lately and it's mobile app as undergone is major revamp.  Just go to Settings and turn on Auto-Uploadr.  It will then back all your photos and videos and continue to do so.  Seriously consider using this app, see below.

OneDrive:  This is from Microsoft for everyone with a Hotmail/Outlook/Office 365 accounts.  Same as the others in that it uploads all your images to the cloud.  Go to Settings and press Camera Back-up.

iCloud -  from Apple.  Obviously this is only for iPhone users.  There is no app to download, just go to Settings on your iPhone and Photos and turn on.  You can set it so that photos taken from your iPhone, MacBooks, iPads etc all backup to the same account and are all saved in the same place and accessible from all your Apple devices.


Dropbox:  Anyone who has ever needed to share a document or photo has thanked the computer deity for Dropbox.  It is simple to use and the end user does not need to install or set up anything.  Everyone should have a Dropbox account and a basic one is free so you have no excuses!  Just install the app, click the Photo icon and turn on Camera Upload

Things to consider;

  1. Do not turn on the 'Use cellular/mobile network' to back up.  Photos and especially videos will use up your mobile data in a flash.  Leave them on wifi only.  I have unlimited data on my mobile, so I actually keep the mobile upload turned on!
  2. Space.  Photos and videos take up space and these free account levels do not usually offer huge amounts of space.  G+ and OneDrive offer around 15GBs which is enough for a few thousand photos.  However, iCloud (5GB) and Dropbox (2GB) offer much less.  The daddy of them all is Flickr, which offers 1000GB!!  This should be enough for a lifetime for most people.  However as cameras improve with higher resolutions, more pixel density and we take more video (4K, 8K, super mega 100K!) who knows if 1000GBs is enough.  For now though, I think that this is the best option.
  3. The apps are all great but I've found that it helps to occasionally go into the app refresh it or press Back-up now.  Every now and then a photo can be missed and this makes sure it uploads everything.
  4. Depending upon how may photos and videos are already on your mobile, the first time you run the auto backup can take a while.  Use a fast wifi network where possible!

It doesn't matter which method you choose, just make sure choose something.  The easiest option is to use the the one that comes with your mobile; iPhone (iCloud, photos), Android (Photos, Settings, Auto Backup) or Windows Phone (really???) (Settings, Backup, Photos).  You can also plug your mobile directly into your laptop/desktop and back it up manually but that involves discipline and who has time to do that regularly.  Sometimes it is months before I plug my iPhone into iTunes!

Now that your photos are safe and backed up..... it's time to get back to taking those selfies!